Today's project will be due at the end of class on December 15th for A4 and on December 16th for B6. The name of the project, like always will be entitled first with the class your in A4SantaGifLastName or B6SantaGifLastName and ending with your last name. The project will be a gif, as indicated by the projects title, so you will need to activate the "motion" workspace which is located inside the Window menu tab located at the very top of the Photoshop window. If your time line is not showing up then you will need to access it and it can be find within the same Window menu tab at the top of the screen.
The project is all about Santa in order for us La Sallians to more enjoy the season. Many people around Christmas like to enjoy a cup of cheer, or many cups of cheer, before retiring to their vehicles to drive home. Now we all know that driving while impaired is an absolutely stupid choice but we need to spread this message to people who may not understand this. Santa, for the sake of this project does not understand this notion so we are going to use him to make a public service announcement. Use your creative freedom here to illustrate this message in any way that you want while meeting the following criteria.
The animation must be between 20-30 seconds which will be shown at the bottom of the animation timeline in white font. There must be at least 5 scene changes (different backgrounds) which can be anything that you want. You must show Santa making his bad inebriated choices (driving or flying in his slay while impaired). Santa must get busted by the cops or be shown in jail in the animation to drive home the point that driving while impaired is not a good idea. You must use text in the animation to say that you shouldn't drive/fly while impaired.
You have three classes to work on this so make this as good as you can within that time. This project's point is to make you more familiar/comfortable with key frames and using the scrubber in the timeline because we will be using it everyday in other programs when we switch to Motion Graphics in the second part of the year.
Tuesday, December 9, 2014
Wednesday, December 3, 2014


1. Open up a new document and change the preset to "Film and Video" and title it accordingly (A4City3DLastName/B6City3DLastName).

3. "Place Embedded" the sky image that I have placed below. Re-size the image to look like mine, the bottom of the picture will be the skyline/ your perspective point of view.


8. Right click the building's layer in the layers palette and choose "New 3d Extrusion from selected Layer."
9. Rotate your building to the right to look like mine in the image.


13. As you can see the building only has an image on the right side and is blank on the front. If you want to add an image of a building you need to go to the 3d tab in the layers palette and choose the "city building extrusion material" like mine is highlighted in the image.


17. Your assignment is to create a city or a town scene. You can use what we you have just created as the start or you can create your own. I just want at least three buildings on each side of the road and three at the end of the road. I also want some people and animals and cars. You are not limited to the amount of people/animals/ and cars that you can place in the image. The point of this project is to take 2d images and make them 3d as well as combining 2d images of people/ animals and cars. Please be as creative as possible.
Monday, December 1, 2014
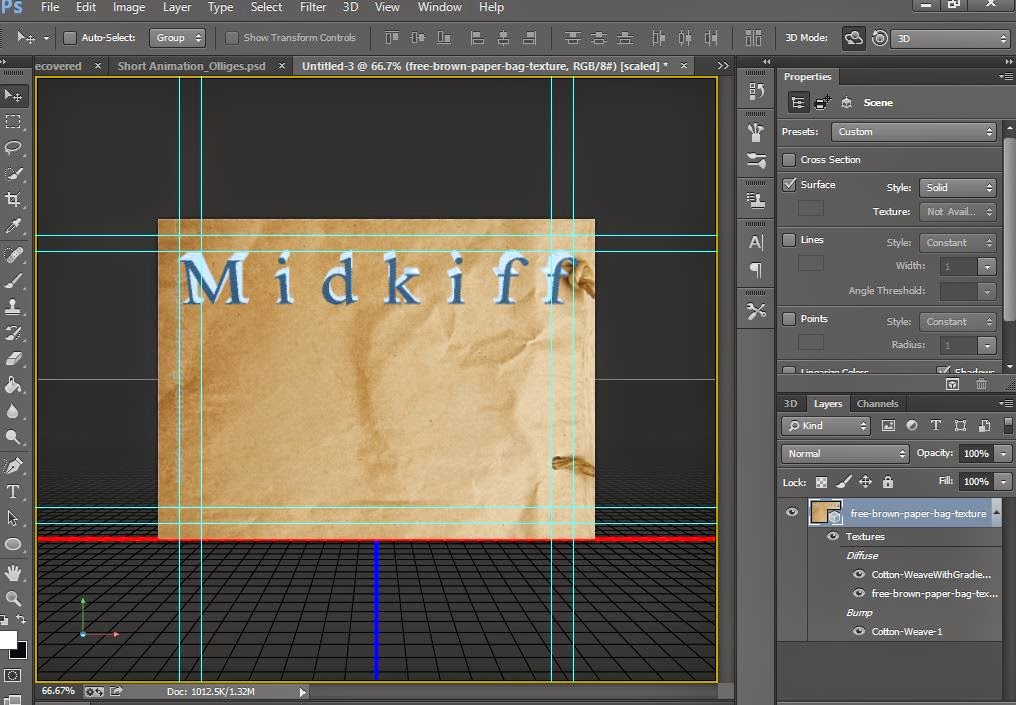
3d Rendered Texture Type
1For this project you will need one of the following background textures. I used the middle paper bag texture for the example.


1. Start new project (ctrl+n) and title it “a43dDemoLastName”
and choose “film &video” from the preset.

22.
“Place embedded” the background image of the
paper bag texture and rotate and scale the image to fill the canvas.

33.
Use the text tool (T) and type your name. Scale
your name’s font size so it almost touches the teal guidelines that it is in between.

44.
Right click on your name’s layer and choose the “New
3d Extrusion From Selected Layer” option and your text will look 3d.

55.
Right click on your “free brown paper bag” layer
and choose the “Postcard” option.

66.
Choose the 3d Tab in your layers palette and
choose your name’s “Front Inflation Material”

77.
Hold Shift and select your name’s Back Inflation
Material”. This should have selected the 5 materials assigned to your name.

88.
Click on the material sphere in the upper right
hand corner of your screen and select any material that you like.

99.
Now select your name’s extrusion material and
change the reflection to 50%.

110.
If you would like to change the coordinates of
your text you can change it in the Properties menu by clicking on the “coordinutes”
cube button.

111.
Go back to the “Layers” Tab in the layer’s
palette, select your text’s layer, hold shift and select the “free brown paper
bag” layer. Go to the “3d” menu bar tab at the very top middle of your screen
and choose “Merge 3D Layers”.
112.
Go back the 3d tab in the layer’s palette and
choose your name’s layer.

113.
Above that layer you will see the “environment”
layer, click on it and at the top right of the page you will see a check boxed
that reads “IBL” uncheck that box.

114.
At the bottom right of the photoshop window near
the trashcan icon is an icon of a light bulb. Click this icon and choose new
infinite light. Angle this light icon towards the upper right hand corner of
your screen as is pictured.

115.
Above that New Light layer click on your name’s
layer and go to the “coordinates” button and using the X & Y numbers,
center your name. To the right of the directional X,Y &Z coordinates is the
option to change the angle tilt of the text, Zero each coordinate out, or
change all three options in the middle row to “0”.

116.
Click the “New Infinite Light” and change the
direction of the light so it is pointed almost straight up but the shadows
should look like mine in the picture.

117.
Now click on the “Current View” Camera layer and
rotate the view of the screen to look like mine.

118.
Change the X,Y &Z coordinates of the “current
View” layer so that no blank canvas is showing in the background. You may also
need to click on your name’s layer and change the coordinates of it so it also
centers up again to look like mine in the picture.

119.
Click on the “New Infinite Light” Layer and
adjust the “color” dial as well as the “shadows” dial.

220.
Go to the “3D” menu bar tab at the very top of
the screen and choose “Render” . . this may take 3 or 4 minutes to render.
221.
In the Layer’s palette click on the layers tab
and right click on the “free brown paper bag texture” layer and choose “rasterize
3d”.
222.
Click on the “Filter” menu bar tab and choose “camera
Raw Filter”. Now change the exposure, highlights and shadows to be the same as
mine.

223.
Now click on the icon button that looks like two
triangles titled “detail” and change the amount to 60.

224.
Click ok and click back on the “Filter” menu tab
button and choose “Blur” and then from the window that rolls out select “tilt
shift”. Change the tilt of the blur to look like mine and change the blur pixel
amount to 3 pixels. Press the blue ok button towards the top of the screen to
lock in the changes.

225.
Back up to the “Filter” menu tab bar and choose
the “Render” Tab and then “Lighting Effects”. Change the lighting to the middle
of the screen if you’d like or just press the blue ok button located towards
the top of the screen.

226.
Save as a Jpeg and turn into the Ldrive.
Thursday, November 20, 2014


Subscribe to:
Posts (Atom)